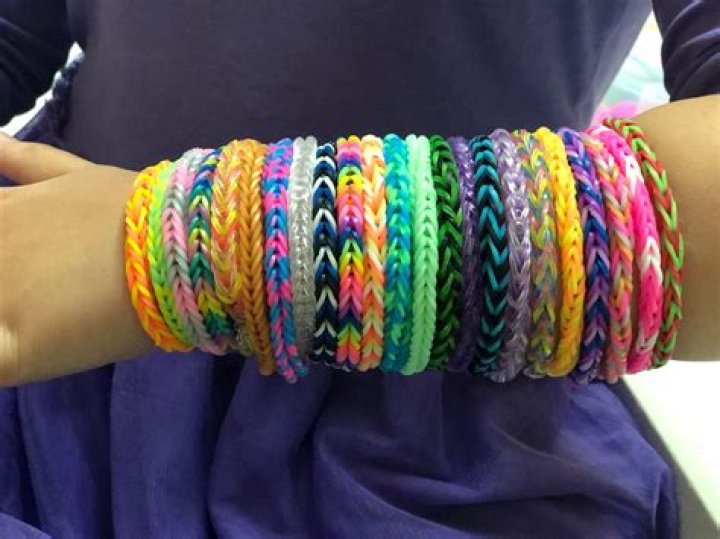
What are those rubber band bracelets called?

Robert Miller
Published Feb 15, 2026
What are those rubber band bracelets called?
What are those rubber bracelets called? Rubber bracelets (sometimes called gel or jelly bracelets) are most commonly called silicone wristbands. In the early 2000s, they were colloquially known as ‘Livestrong bands’ due to the Livestrong Foundation’s success in selling the yellow, debossed version for cancer research.
Is Rainbow loom still a thing?
The Rainbow Loom trend, some have said, is over. The plastic loom with the tiny, colorful rubber bands used by tweens to make bracelets, rings, even flip-flops, was declared dead last Christmas, due to over-distribution.
What can I use instead of a rainbow loom hook?
I can’t completely dislike anything that gets my kids creating, but there are SO many eco-friendly Rainbow Loom alternatives.
- beaded ribbon bracelet.
- button bracelets.
- easy friendship bracelet.
- finger knitting.
- folded paper bracelets.
- friendship bracelet on a cardboard loom.
- recycled weaving looms.
- sailor’s knot.
Why did Silly Bandz get banned?
Silly Bandz have been banned in many classrooms for being too distracting, with students trading them with each other during class. There have been incidents where children have cut off circulation by extending several Silly Bandz up their arms, in some cases causing serious injuries.
Do Silly Bandz still exist?
As with other toy fads, such as the hula-hoop, Silly Bandz mania was short lived. However, although American children are no longer interested in collecting Silly Bandz, they are easily recycled and reused for their original purpose, as rubber bands.
Do people still buy Silly Bandz?
How to make a rubber band bracelet with beads?
– Start to make a chain rubber band bracelet: Fold one rubber band in half. – Slip a second rubber band through both loops of the first. – Repeat this with additional bands until desired length (depending on your bead size and intended final circumference of the bracelet). – Pull a rubber band through a bead so that the band sticks out both sides. – Treat the beaded rubber band as you have the others in making your chain, just pass it through the last band on the chain. – Loop a band through the beaded band just as you have been for the rest of the chain. – Feed a band through the next bead and add it onto the chain as you did the first. – After you add the last bead, just continue the chain with bands until the desired length. – Clip the ends together. Tada!
How do you make rubber band bracelets?
1) Arrange your elastic bands on the loom. You can use any color that you like to make the pretty bracelet. 2) Make sure that the arrow on the loom is pointing up at the beginning. 3) Place your first rubber band on the first pin of the left column of the loom. 4) Place your second rubber band on the first middle pin, on top of your first rubber band. 5) Place your third rubber band on the last pin used, or on the second pin on the left column of the pin and stretch to the second pin 6) Continue the steps until you get to the last pin on the loom. 7) Spin the loom in the opposite direction so that the arrow is now pointing down or towards you. 8) Use the hook of the loom and start to hook the first pin on the middle column and grab the rubber band, the one that crosses the opening 9) Pull the rubber band up with the hook and attach it to the pin on the right which is located diagonally above the first middle pin. 10) Take the rubber band on the right pin, the one where you last attach your first rubber band and hook it to the pin on the left, or 11) Repeat the steps all the way to the last rubber band. 12) After you finish attaching all the rubber bands, take the last band on the pin with the hook and pull your beautiful bracelet side to side off the 13) Secure the end of the rubber band bracelet with the clip and hook the clip on the other hand of the bracelet.
How do you make a crazy loom bracelet?
– Place the crazy loom vertically in front of you so that the pegs form a U-shape. Some looms have an arrow to indicate the right side up. – Take one band and loop it from the center-bottom peg diagonally across to the first loom peg on its right. – Take the next band in the same or contrasting color and loop it around the peg where the first band ended. – Continue this looping of new bands on alternate pegs between the two columns until you reach the end of the loom. – Once done, take a new band, loop it around itself to form a figure eight that is folded down in half, and loop both rings around the last peg that – Now take the loom hook and carefully lift the last looped band on the last peg until it is through the figure eight band, and then onto the next diagonal – Continue in this way down the length of the loom, each time hooking the inner band through the outer band on that peg, and then onto the next diagonal peg. – Once you finish forming all the links, take a C-clip and attach it to the band at the end.